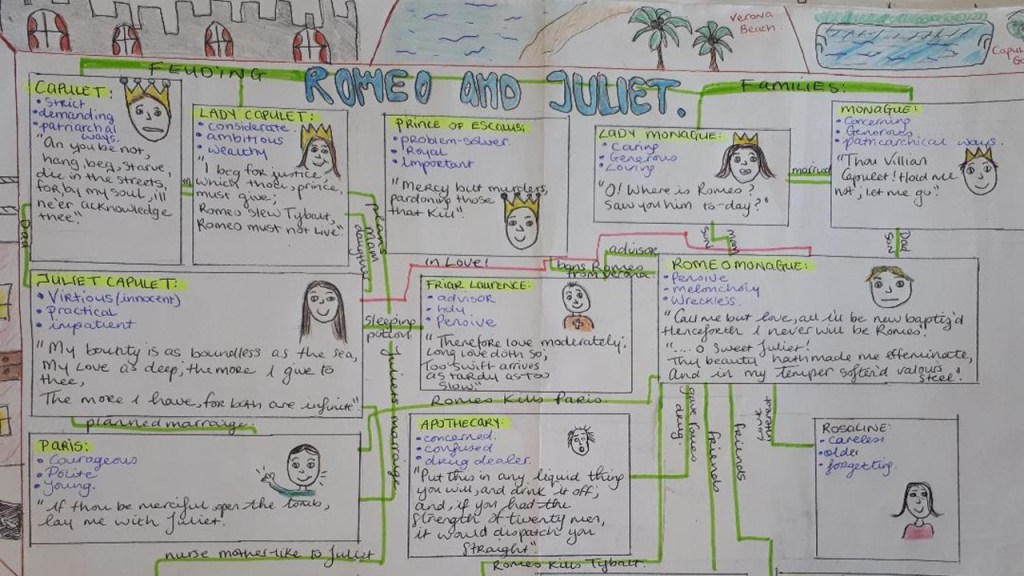
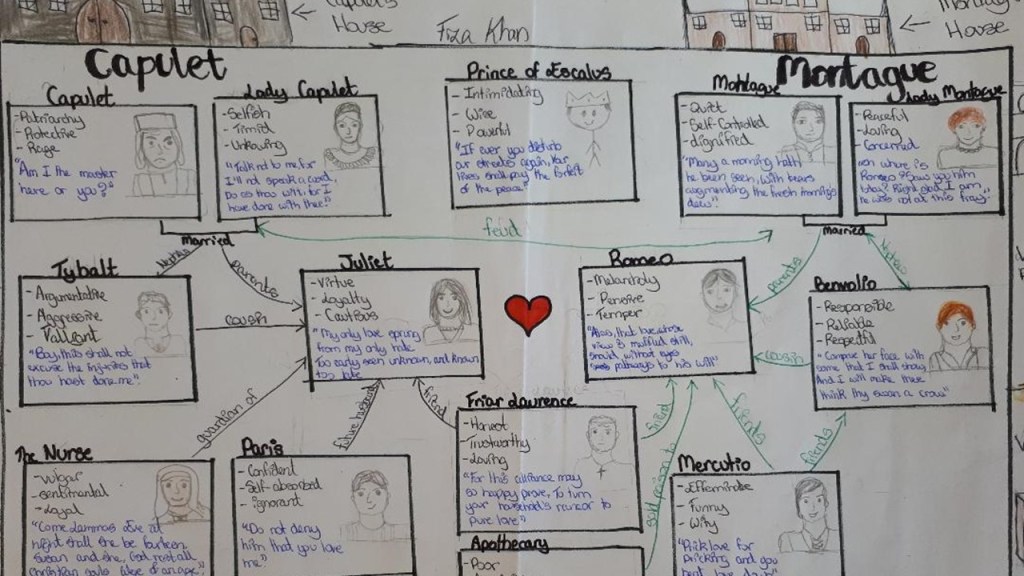
What is a Text Map?
A text map is a visual representation of the world of the text being studied. A text map organises, categorises, connects and creates a hierarchy of all of the main characters in the text. It also lays out the main settings of the text and the characters connections to the context.
Why create a Text Map?
When exploring the world of a text, students of English have to grapple with the context and setting of the text, a multitude of characters in the text and their relationships to each other. At the same time, they also have to make sense of the power structures and societal hierarchies of the text dependant on the context of the text. In terms of cognitive load, the burden of making sense of the world of a text is a heavy load. It is no surprise therefore that some students fail to make observations and connections around the bigger picture of a text, when cognitively they are under pressure already processing the characters and context. A text map can be used as a visual aid or scaffold, a writing aid, an example of a multi-modal text or a revision tool.
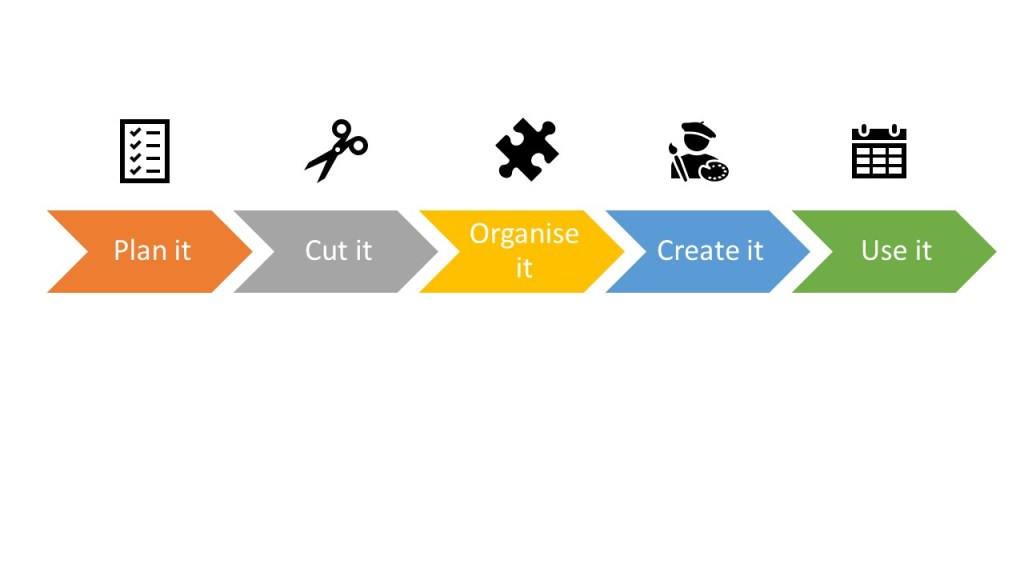
The Steps
- Plan it: Skim and scan through your text and collate all the information needed
- Cut it: Cut out any unnecessary information and upgrade vocabulary
- Organise it: Group, Categorise and Hierarchy
- Create it: Pencil, Marker, Style, Icons, Links
- Use it : As a scaffold or study aid.
Approaches you can take
There are many approaches you can take to creating a text map. The one I find most effective is:
- Show students models of excellent text maps
- Teacher takes students through each step
- Put students in small groups for the Plan, Cut and Organise steps
- Students complete the create step individually
- Students return to small groups for the Use it step.
Plan it
1.List the characters in the text
2.Think of three things that stand out about each character (personality or appearance)
3.Find a quote for each character that sums up what that character is about (can be something they said themselves or something the narrator or another character said about them)
4.List all of the important settings in the text
5.Find a descriptive quote that sums up each setting
Cut it
1.Look through your list of characters- are there any characters on your list that you would consider minor characters that have no major impact on the story? Do they need to be on your text map?
2.Look at the three things about each character- could you refine these down to one a phrase of word? Have you chosen the best word to describe them? Could you choose more challenging vocabulary?
3.Look at the quotes you have chosen for each character – could you cut out any bits of the quote that are not necessary?
4.Look at the settings you have listed. Are all of these important settings? Are there any you would consider as not having an impact on the story?
5.Look at the quotes you have chosen for each setting- could you cut out any bits of the quote that are not necessary?
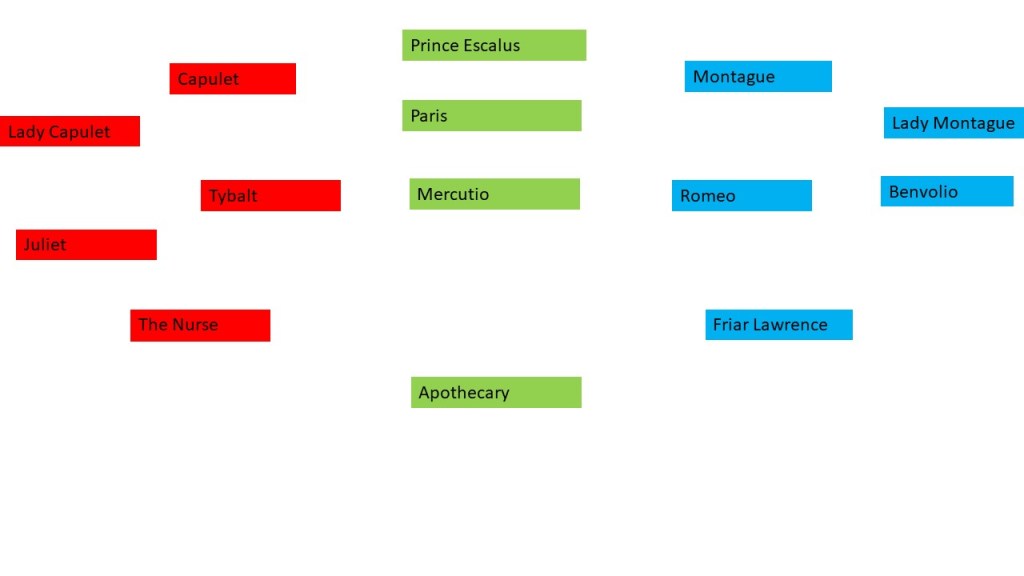
Organise it
1.Write all of your setting locations onto a post-it.
2.Now think about how you will arrange the settings on the outskirts of the page. Do the settings appear in any specific order in the text? Are any of them linked together? and should they therefore appear next to each other. Arrange your settings around the page in an order that makes sense to the text.
3.Write out each character’s name on a post-it
4.Categorise the characters in the text by grouping the post-its together. What is it about these characters that might bind them together in some way? Are they related? Are they friends? Are they enemies? Do they work together?
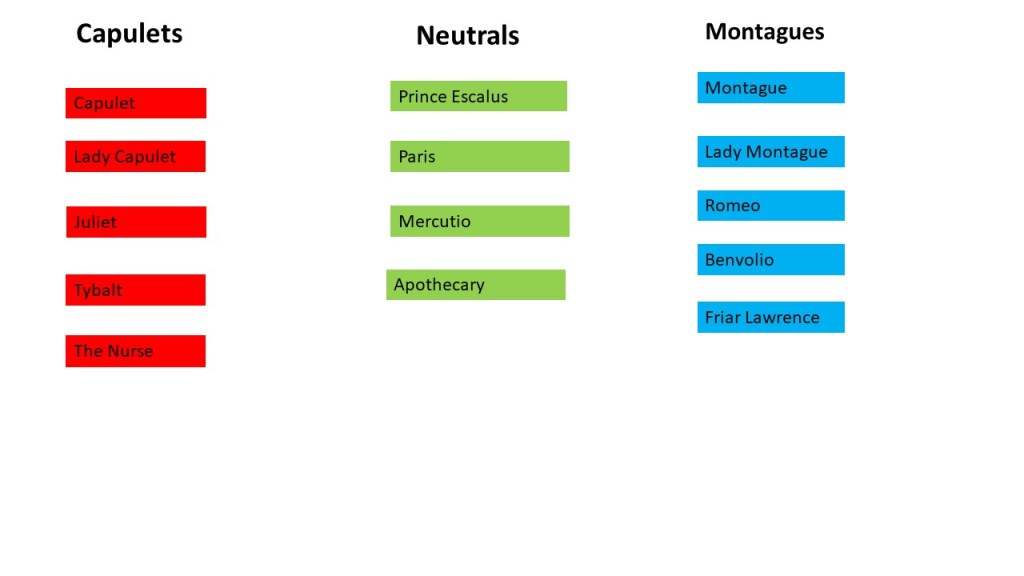
5.Now arrange the post-its according to the power structure and hierarchy of the text. Do this by thinking about who holds the most power? – place them at the top of the map. Who holds the least power? – place them at the bottom of the map. Do people hold more power because of their race, religion or sex? You now have created the layout for your map.
6.Now think about all of the connections and relationships between all of the characters in the text. Who is in love with who? Who murders who? Who is related to who? Draw a line from character to character and name the relationship on the line you have drawn.

7.Finally, draw in any links between the characters and the settings and name that link on the line you have drawn.
Create it
1.Put your post-it note page in front of you and use an A3 sized page and a pencil to begin with.
2.Draw in setting border first around the outside of the page, write in the settings and their descriptions.
3.Using your post-it page as a guide, write in your characters, their characteristics and quotes
4.Now is the time to think about some design features, the first one being colour. Are there any details from the text that suggest specific colour, for example a characters eye or hair colour, the colour of a house.
5.The next design feature to think about is how you can visually represent the characters. Maybe you would like to represent the characters with a symbol or icon (flaticons.com or thenounproject.com) or maybe you would like to sketch your understanding of the characters yourself
6.Finally think about the design of your containers and connectors. How are you going to contain the information for each character? A box, a circle, a picture frame, a cloud? How are you going to link characters? a simple line, a dotted line, a broken line, double sided arrows?
Use it
1.As a visual aid or scaffolding when writing about a text
2.Try to re-sketch your text map from memory. Check against your original. Now you know what you do know and what you do not know. Fill in the gaps in your knowledge. Try to re-sketch again in a weeks time. You will notice you retain more and more in your memory each time you do this.
3.Give somebody else the map and get them to ask you questions about the characters and settings. Try to recall as much as possible from memory. The person with you can tell you if you are correct and can fill in your knowledge gaps if you have forgotten something.
4.Sit down with someone with the map in front of you. Tell the person with you about the world of the text by pointing out the different characters and settings. Get the person with you to ask questions about why you chose to link certain characters or why you chose to place a character at the top of bottom of the character hierarchy of power.
5.Hang your map somewhere that you will see it everyday. Point to something different on the map everyday that you pass it and read out loud that section of the map.
How to Video
Watch this How to Video to help with the creation of a text map
